
Intro to
Funnels
Building Your
Funnel
Edit Your
Funnel
The Event
Funnel
Event Funnel
Pages
Event Funnel
Emails
Keys to a
Successful Funnel
Prepare to
Launch
Test Your
Funnel
Set Up Your
Next Event
Funnel
Diagrams
Event Funnel Walkthrough
INTRO TO FUNNELS
Brochure Website vs. Funnel
BROCHURE WEBSITE
What is a Brochure Website?
Brochure Websites have multiple pages that people can browse through in any order.
You might see a Home Page, About Me, Services, Success Stories, Contact Me.
Example of Brochure Website
Here’s our Thrive Academy Brochure Website ↗️.
Benefits of a Brochure Website
Your people get to browse at their own pace.
Your Brochure Website can increase your Credibility.
You can show the success story section of your website to potential clients on Consults.
Challenges of a Brochure Website
Websites usually don't inspire your potential clients to take action. They often leave websites thinking... I'll come back later."
FUNNEL
What is Your Funnel?
Your Funnel is a series of webpages. On each webpage, you can either:
A | Go to the next step in the funnel or
B | Leave the site.
The first step of every funnel is to invite them to opt in with their name and email address.
If they don't take the next step(s), they will automatically get emails, inviting them to take the steps with you.
Benefits of a Funnel
Funnels are way more effective at inspiring people to take steps to become your client.
Examples of Funnel Next steps
Opting in for your Free Gift or Free Event.
Applying for a Consult.
Scheduling a Consult
Our Summit Funnel ↗️ invites people to opt in to the Client Attraction Summit.
Where do you send new people?
When you are engaging with people on social media, your email list, your workshop or speaking gig, a podcast, etc... we recommend sending all of these new people to your Funnel. :) Because once they opt in, you can stay in front of them until they opt out.
Why Funnels are Amazing
In 2007, we (Jesse & Sharla) created our first funnel with a homemade video and simple funnel that we pieced together... We made $732,000 that year from people who went through that funnel.
It wasn't until 2013, when we had already made many millions of dollars, when we finally got a traditional website (which we only use for credibility).
We've gone on to make over $30 Million Dollars in sales from people who have gone through our funnels.
Thrive Machine App!
Would you like to be able to access Thrive Machine on your phone?
This is great for finding your contacts, emailing and texting them, and accessing your calendar (with all of your consult and client appointments)... All while you're on the go!
The app is called: Lead Connector.
You can find it on App Store or Google Play (and it's free to download).
How Long Will This Funnel Take to Launch?
Funnels can supercharge your client attraction ability
This is because they automate the process of client attraction.
How long will it take to launch my funnel?
Launching your funnel can take months or years... it's a steep learning curve that involves tech prowess, copywriting, graphic design, and business strategy… which is why most gifted Coaches and Holistic Practitioners never launch.
Thrivers who build their funnel themselves (using our 80% done-for-you templates) still take a looooong time to finish it, depending on their skill level.
If we build it for you, we will build it in 2 weeks - 2 months (depending on how many Thriver funnels are in the queue before you).
Avoid Embarrassing Mistakes
This is your funnel that represents your business… so it’s important that you take full responsibility for it.
Before you launch your Funnel, even if we build it for you, it’s essential to:
1 | Read through THIS ENTIRE Walkthrough (and watch all the videos).
2 | Fully Test your Funnel using the Test Your Funnel Section below. ⬇️
Having a funnel is NOT a magic pill
Once you build your funnel, the next step is to optimize it.
Your funnels will bring in more clients as:
1. You send more people to your funnel.
2. Your Copywriting skills get better.
3. You have more success stories.
4. Your branding and photos get better.
BUILDING YOUR FUNNEL
How to Build Your Funnel Yourself
Step 1 | Get Fully Onboarded in the Thrive Machine
Haven't gotten fully onboarded?
After you log into the HUB
Go to Thrive Machine / Get Onboarded ↗️.
Step 2 | Read the Rest of this Funnel Walkthrough
Missing even one section could create a roadblock later.
Step 3 | Build this Funnel
Use the Event Funnel Checklist ↗️
Step 4 | Ask for Support
Log into the HUB,
Go to Thrive Machine Page / Get Support to discover the 24/7 support available to you.
Step 5 | Test and Launch This Funnel
Use the "Test Your Funnel Before Going Live" Section below to fully test your funnel before launching.
If you don't want to do all of that work, Thrive will build the funnel for you. See the next section for details.
Thrive Will Build Your Funnel For You!
Step 1 | Get Fully Onboarded in the Thrive Machine
Haven't gotten fully onboarded?
After you log into the HUB go to Thrive Machine / Get Onboarded ↗️.
Step 2 | Earn or Purchase 1,000 Coins
Option 1: You get 1,000 Coins by getting 100,000 Points. Points convert into coins automatically. Points never decrease. Coins decrease when you spend them.
Option 2: Buy Coins. You can buy 100 Coins for $100 and 1,000 Coins for $1,000. 1,000 Coins is the price of each funnel.
Step 3 | Purchase Your DFY Funnel with Coins in the Thrive Shop
To purchase a Done-For-You Funnel, go to the Thrive Shop ↗️ and choose the Funnel you want Thrive to build.
Step 4 | Follow the Process in the Thrive Shop
Once you use your coins to pay for the funnel, you'll need to fill out 3 forms:
・An Agreement Form;
・Step 1 Form; and
・Step 2 Form.
Once we receive these 3 forms, and everything you submitted looks good, Thrive will build your funnel for you.
You can expect to receive your DFY funnel, ready to launch, within 2 weeks - 3 months of submitting the Step 2 form.
Step 5 | Maintain and Optimize Your Funnel
Once your funnel is delivered to you, you will be 100% responsible for maintaining it, and optimizing it.
Fortunately, we have a lot of support available for you.
🌱 To access our support
Log into the HUB, go to Thrive Machine Page / Get Support ↗️.
Which Funnel Do You Create First?
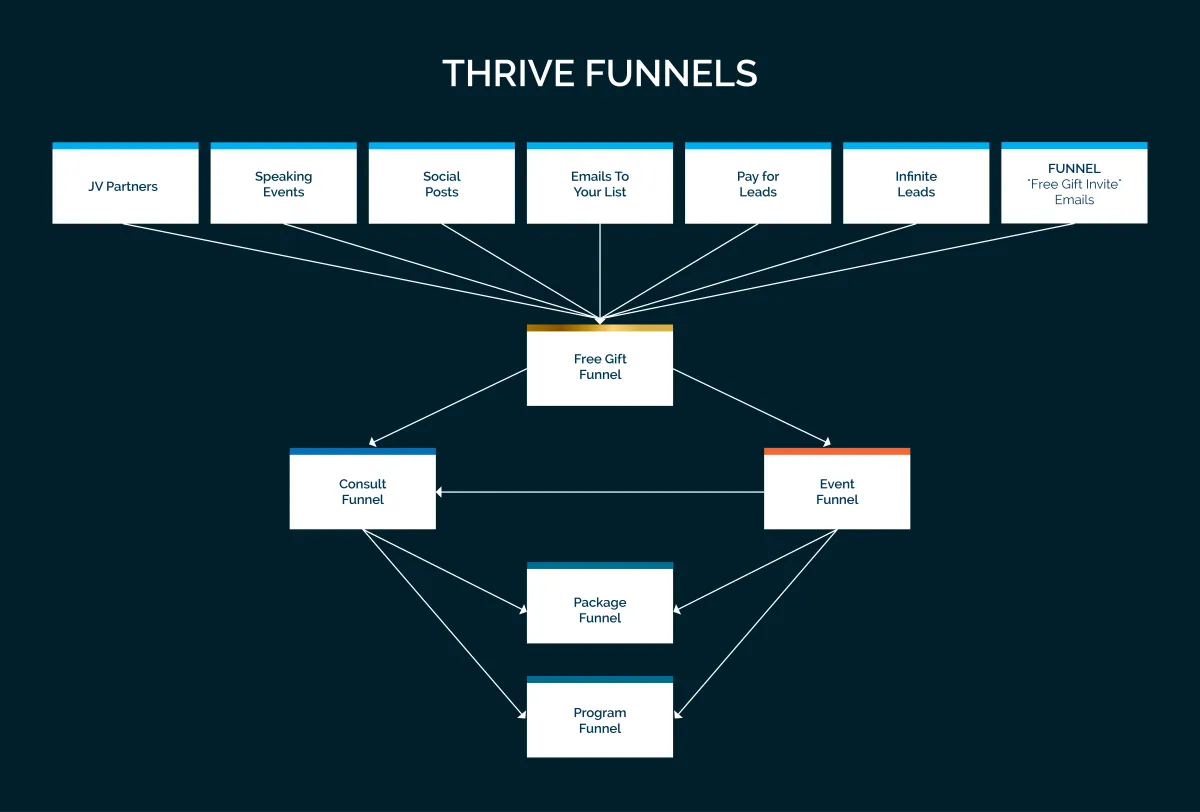
The Thrive Funnels fit like a puzzle. Having all 5 funnels is most effective. But each funnel stands alone and can help you get more clients with ease.
THERE ARE 5 PLATINUM FUNNELS
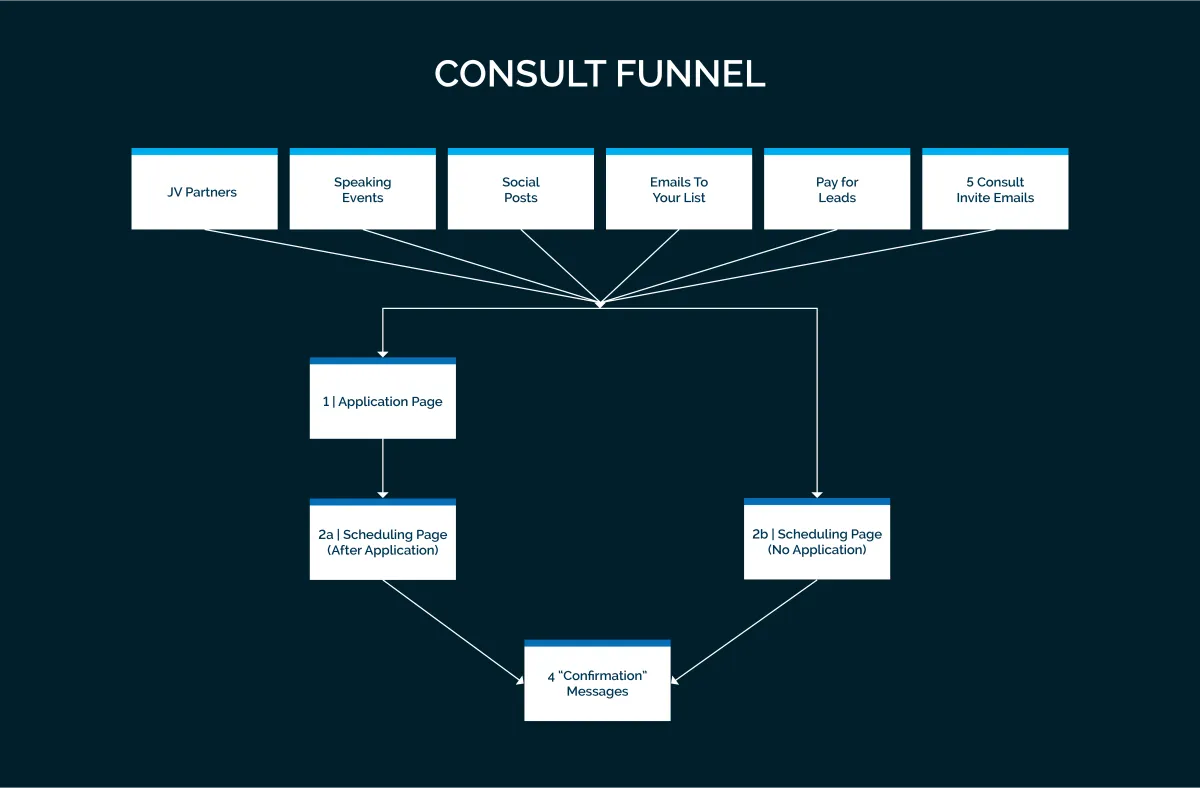
1. Consult Funnel:
Intended Result: Book MORE consults (with less effort).
2. Free Gift Funnel:
Intended Result: Grow Your Email List Faster (by getting the HIGHEST % of Opt-Ins).
3. Event Funnel:
Intended Result: Get more Event Sign Ups, Event Show Ups, and Upgrades (after the event).
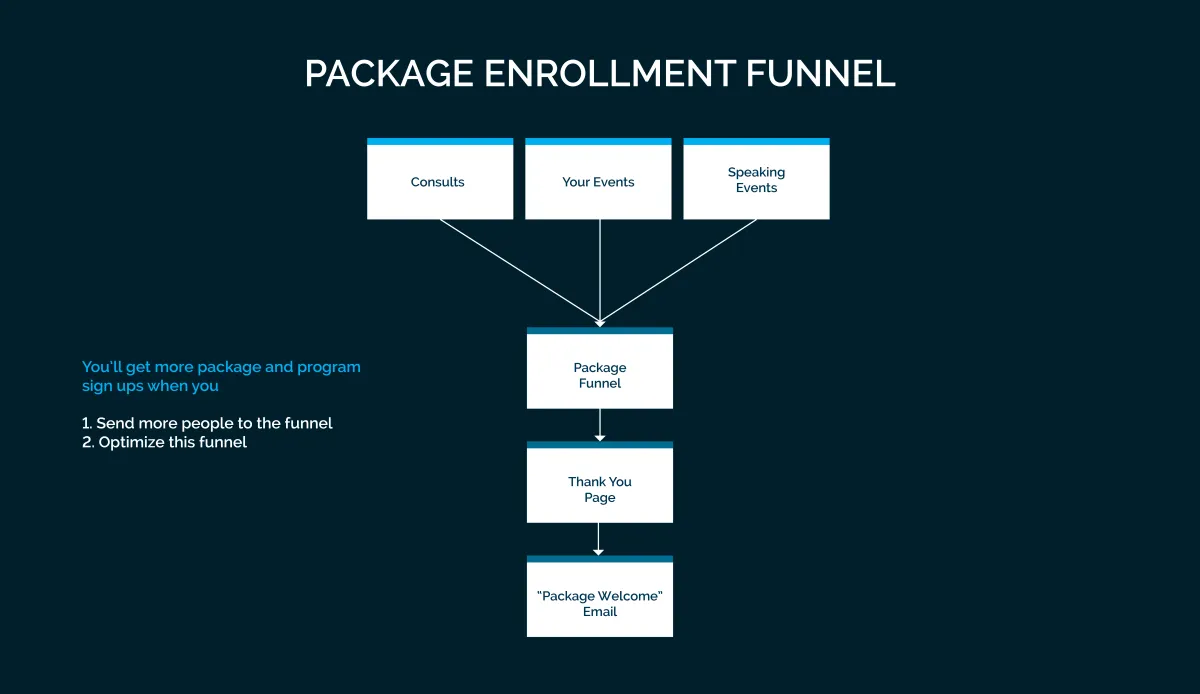
4. Package Funnel:
Intended Result: Elegantly taking payment (with less effort).
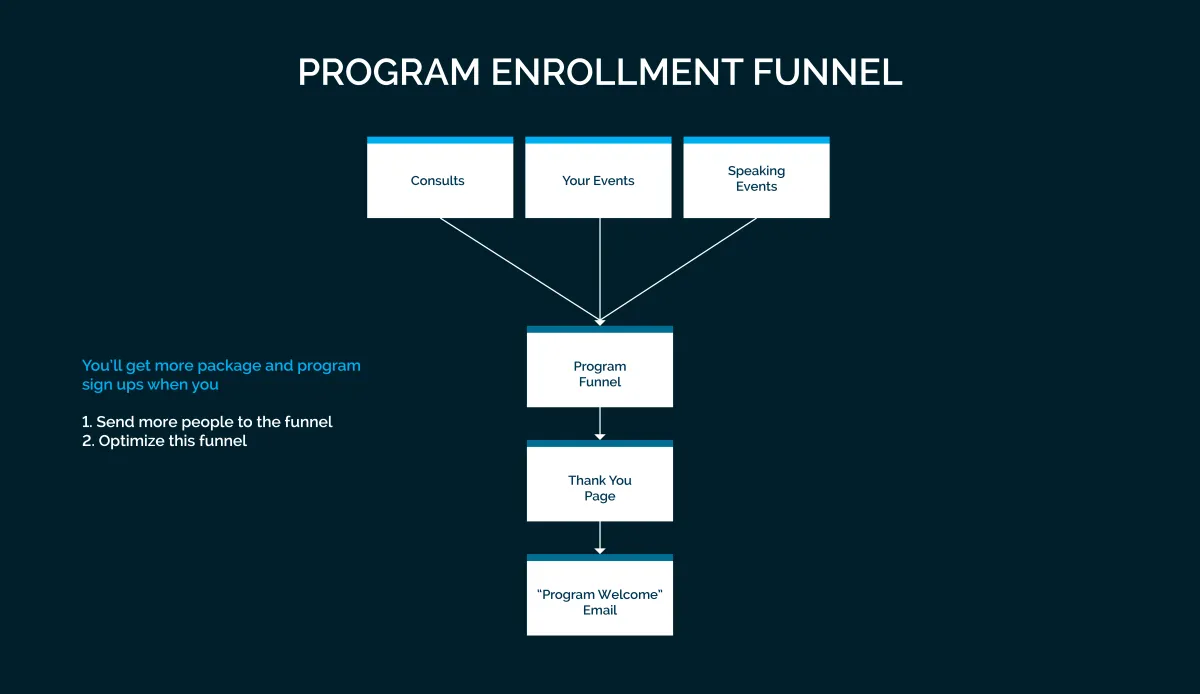
5. Program Funnel:
Intended Result: Elegantly sign people up for your program.
WHEN YOU HAVE ALL 5 FUNNELS
Having all 5 funnels gives you the freedom and flexibility to run your business in a way that supports your lifestyle.
1 | Your people will start with your Free Gift Funnel (to get easy Opt-Ins).
2 | Then, they'll go to Event Funnel for Event Sign ups, OR Consult Funnel for Consult sign ups.
3 | Then, they'll go to Package Funnel to join your package OR Program Funnel to sign up for your program.
WHICH FUNNEL DO YOU SET UP FIRST, SECOND, THIRD?
Step 1 | Rank the 5 funnels above in the order they’ll be most useful to you.
Step 2 | Start with the funnel that will give you the result that is most important to you now.
Step 3 | Then, add funnels in priority order.
To see what is inside of each funnel, go to the diagrams at the bottom of this funnel. ⬇️
HOW TO EDIT YOUR FUNNEL
What Are the Basic Editing Tools?
🌱 BEFORE EDITING
Clone allows you to clone a page or the whole funnel.
Edit in New Tab allows you to edit the funnel page in a new tab.
🌱 EDITING
Write or Edit the way you would if you were typing in Google Docs.
Drag allows you to move rows around your page.
Duplicate allows you to duplicate a section or row.
Delete removes your row.
🌱 AFTER EDITING
Save allows you to save your work. It does autosave, but to be sure you don't lose anything, it's important to save your work frequently.
Publish after you save your work, so that the changes you make will be published.
Preview allows you to see the webpage that your people can see (and allows you to use the drop downs and click the links).
Versions will allow you to restore any of the last 30 saved versions of your page.
🌱 REPLACING PHOTOS
To replace photos in your Funnel page (like your banner or client photo), watch this quick video tour about editing and formatting your Funnel images here. ↗️
If you need to know how to upload images in your Thrive Media Library, watch this step-by-step video here. ↗️
🌱 SNAPSHOT MAINTENANCE
If Thrive does an update and you haven't touched the previous version, we recommend that you delete the previous version. You can do that by watching this 1-minute video. ↗️
The Difference Between “Edit” Version & “Preview” Version
There are 2 versions of all Funnel Pages.
Version 1 | The Edit Version
This is the version you can edit.
You will see orange boxes around the text and you'll find the "Get Support" button here.
How do you get to the Edit Version?
From the Funnel Steps menu, click on the blue button called "Edit." This will replace your current window.
OR click the arrow pointing down and select "Edit in a new tab."
Version 2 | The Preview Version
This is the version your people will see.
This is where the links on the pages will be clickable.
How do you get to the Preview Version?
From the Edit Version Page, go to the upper right hand corner. Click the eye icon next to the white "Save" button.
The Preview Version will open in a new tab.
THE EVENT FUNNEL
Why is an Event Funnel Crucial to Success?
Leading Events (or speaking at Events) is the fastest and easiest way to bring in new clients. Thrive has brought in over 3,000 amazing, high end clients and they all came from events we led.
And, Thrive Members have led events or spoken at events that have led to them making MANY millions of dollars.
We cannot guarantee your immediate success when you launch your Event Funnel because it may take a few months to dial your funnel in.
But... we can guarantee that it will be WAY harder to have a successful speaking (or events) business WITHOUT a really good Event Funnel. Because when your process is not automated (and you're doing everything manually) you'll work harder and make less money... which is the fast track to burn out.
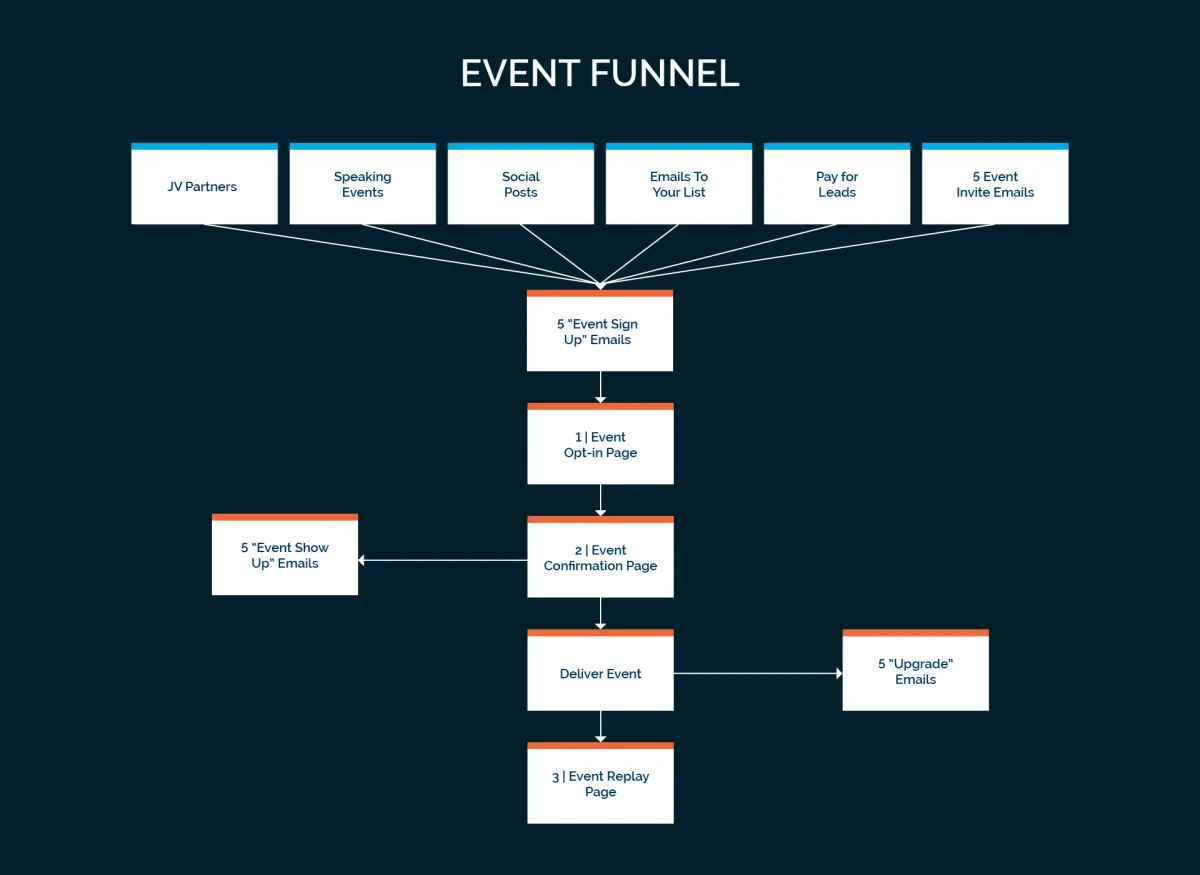
The Event Funnel... Explained
Here is a brief summary of the Event Funnel.
Your Event Funnel includes:
・3 Series of Emails
・3 Webpages
3 SERIES OF EMAILS
5 "Event Sign Up" Emails
This email series encourages people to sign up for your event. These emails can also be turned into Social Media posts.
5 "Event Show Up" Emails
This email series encourages them to attend your event. This can prevent you from losing many of the people who sign up.
5 "Upgrade" Emails
This email series begins with Upgrade Email 1 | Replay. This email invites your people to visit the Event Replay Page... It's an optional email that you'll send manually after you have added the recording link to your Replay Page.
Upgrade Emails 2-5 are automated & invite your people to book a consult. (You can edit this series to instead go directly to your Package or Program Funnel.)
Exponential Increase
When you increase your Sign Ups, Show Ups, and Upgrades, this will exponentially increase the success of your speaking career.
3 WEBPAGES
1 | Event Opt-In Page
This 1st page automates opt-ins for your Event.
2 | Event Confirmation Page
This 2nd page provides logistics & increases Event show ups.
3 | Event Replay Page
This 3rd page hosts the "Event Recording" and invites your people who watch the recording to book a Consult.
EVENT FUNNEL PAGES
1 | Event Opt-In Page
The Event Opt-In Page invites them to opt in for your event and automates these opt-ins.
There are two fancy features that come with this Opt-In Page:
1 | Countdown Timer
2 | Event Opt-In Form
1 | COUNTDOWN TIMER
Go here to learn more about the Countdown Timer ⬇️
2 | EVENT OPT-IN FORM
On this page, your people will fill out the Event Opt-In 8.0 Form by filling in their Name & Email.
Once they opt-in, they'll go to the Confirmation Page and get the Show Up Emails.
How can I edit the Event Opt-In Form?
Step 1 | On your Thrive Machine account, select the “Sites” tab on the left side.
Step 2 | At the top navigation bar, select “Forms” and then go to “Builder.”
Step 3 | Look for the form you want to edit by scrolling through the 8.0 Forms, OR manually search for them in the right search bar.
Step 4 | Change the form by directly editing the fields, For more detailed instructions to edit your forms, click here ↗️.
2 | Event Confirmation Page
This Event Confirmation Page provides Event Logistics & increases Event show-ups.
This is also where your people will see the:
1 | Countdown Timer
2 | "Add Event to Calendar" Button.
1 | COUNTDOWN TIMER
Go here for more about the Countdown Timer ⬇️
2 | "ADD EVENT TO CALENDAR" BUTTON
What is the "Add Event to Calendar" Button?
The "Add Event to Calendar" Button is located on the Event Confirmation Page and allows them to add your event to their personal calendar.
When they click the button, they'll receive 4 calendar options, so they can save your event date to their preferred calendar.
The 4 calendar options are: Google Calendar | Apple Calendar | Outlook Calendar | Yahoo Calendar
Why is the "Add Event to Calendar" feature important?
Including this button will increase the likelihood that they show up for your event.
Get instructions to adjust your "Add Event to Calendar" Button here:
3 | Event Replay Page
The Event Replay Page is optional
You can lead events without providing the Replay or Recording of the event.
The Replay is for people who signed up but didn't show up
It's possible to get 40 sign-ups and only 20 show-ups. So, the Replay re-engages those people, and can increase your impact and income.
The Event Replay Page:
1. Hosts the "Event Recording".
2. Invites your people who watch the recording to book a Consult.
Your Event Recording
Your Event Recording comes from recording your event on Zoom or setting up a Video Recording Device at your in-person event.
Post-Event Set Up
Before you send the replay email, you'll need to immediately take care of 3-4 things:
1. Upload your Event Recording to the Event Replay Page.
2. Link your Consult Calendar in the Event Replay Page.
3. Link your Event Replay Page in your Event Replay Email (and proofread the email).
4. [Optional] Redirect Event Opt-in Page to Event Replay Page.
Don't know how to do those 3-4 things?
Event Funnel Set-Up | Post-Event Instructions | Parts 1-4 ↗️
EVENT FUNNEL EMAILS
How Do the Emails Work?
This funnel comes with 15 emails. You can see all the emails in the Event Funnel Workflows 8.0.
5 "Event Sign Up" Emails
5 "Event Show Up" Emails
5 "Upgrade" Emails
・1 "Event Replay" Email
・4 "Upgrade" Emails
The emails start and stop based on the automations that we have built for you.
1. You can add or remove emails (or texts) inside the Workflow.
2 You can change the Wait Time in between each email or text (so that the emails are sent more frequently or less frequently).
How do the links work in my emails?
In your emails, you will see call-to-action (CTA) phrases like “Reserve Your Spot Now,” or “Book a Call".
These links take your people to a webpage in your funnel. The links are embedded into the CTA phrases, so you have short & clean links, and are more likely to get clicks.
If you edit or remove these links, make sure to test them before launching… (to ensure that the links work as intended).
Want to edit your CTA links?
・Go to the Settings Tab on the bottom left of your Thrive Machine account.
・On the left side, scroll down and click on "Custom Values."
・Go to the Folders tab and click "Snapshot Assets."
・Click on the three dots of your page link and choose "Edit the custom value."
・Change the link to your preferred webpage.
5 "Event Sign Up" Emails
The purpose of 5 "Event Sign Up" Emails is to invite people on your email list to sign up for your event.
When do the "Event Sign Up" Emails get sent?
This email series automatically initiates when they are manually added to the “Event Invite” tag. They will receive:
Sign Up Email 1: (7 days before Event)
Sign Up Email 2: (5 days before Event)
Sign Up Email 3: (3 days before Event)
Sign Up Email 4: (1 day before Event)
Sign Up Email 5: (6AM morning of Event)
Where will I find the Event Sign Up Email Series?
Go to: Automations / Workflows
Event Funnel Workflows / 1 | Invite Them to Event
How do I initiate this email series?
Step 1 | On the left side of your account, go to Contacts.
Step 2 | Check the box(es) of the person/people you want to add.
Step 3 | Click the “Add Tag” button in the top navigation bar.
Step 4 | Choose the tag you want added from the dropdown menu.
Will they continue to get Event Sign Up Emails after they opt in for the Event?
No, they will automatically be moved to the "Event Show Up" Email Sequence (described in the next section).
5 "Event Show Up" Emails
The purpose of 5 Event "Show Up" Emails is to encourage the people who sign up to show up for the event they signed up for.
When do the "Event Show Up" Emails get sent?
This email series will start automatically, as soon as they sign up for your event. They will receive:
Show Up Email 1: (Immediately after Event Sign Up)
Show Up Email 2: (3 days before Event)
Show Up Email 3: (1 day before Event)
Show Up Email 4: (6AM morning of Event)
Show Up Email 5: (1 hour before Event)
Where will I find the Event Show Up Email Series?
Go to: Automations / Workflows
Event Funnel Workflows / 2 | Show Up for Event
How does this automation get turned off?
If someone cancels their registration to your event, you will need to manually stop the automations. To remove them from your 5 "Event Show Up" email campaign:
Step 1 | Go to their contact record.
Step 2 | Scroll down and click the dropdown called "Automation".
Step 3 | Remove them from "Workflow 2 | Show Up for Event".
5 "Upgrade" Emails
The purpose of the 5 "Upgrade" Emails is to enroll the people who didn’t upgrade at your event in booking a consult.
Who is this email series sent to?
Everyone who opted in for your event.
When do the "Upgrade" Emails get sent?
This email series automatically initiates after the event.
Upgrade Email 1 | Replay: (Optional, when you manually send it)
Upgrade Email 2: (12 hours after event ends)
Upgrade Email 3: (1 day after event ends)
Upgrade Email 4: (2 days after event ends)
Upgrade Email 5: (3 days after event ends)
Where will I find the Upgrade Email Series?
Go to: Automations / Workflows
Event Funnel Workflows / 3 | Upgrade After Event
UPGRADE EMAIL 1 | REPLAY EMAIL
This email sends your people to the Event Replay Page to watch the "Event Recording".
The Replay Email is optional.
This is the only email that is NOT automated. It’s not automated because:
1 | You may not want to offer a replay…
2 | You probably don’t want the email to go out before you upload the recording.
When should you send the Replay Email?
You or a team member should send the Replay Email 1-2 hours after your event.
How do you send the Replay Email?
Go to Event Funnel Set-Up | Post-Event Instructions | Part 3-4 ↗️
What happens once they go to the Event Replay Page?
They will get to watch the video recording of your event and book a consult with you.
UPGRADE EMAILS 2-5 | CONSULT INVITE EMAILS
Upgrade Emails 2-5 invite everyone who opted in for your event to book a consult. These will NOT be sent to those who book a consult at your event (or after).
Why invite them to book a Consult?
This is an opportunity to enroll them in your package or program.
Very Important:
1. If you invited people to your package or program (at your event)...
You’ll need to remove the "Event Replay" Tag from the people who signed up for your package or program from this email series. To remove them from your 5 "Event Show Up" email campaign:
Step 1 | Go to contacts and add a filter for Tags.
Step 2 | Choose the "Event Replay" tag and click "Apply" at the bottom right.
Step 3 | Select all contact records. Then in the top navigation bar, click the "Remove Tag" button.
OR
2. If you have your Package and Program Funnels launched...
You can edit the Upgrade emails to replace “book a consult” with “join my package” or “join my program”.
How to Edit Your Emails & Automations
EDIT YOUR EMAILS
Step 1 | Go to Automations.
Go to the Left Column of Thrive Machine and click "Automations". Then, click on Event Funnel Workflows 8.0. You'll see:
1 | Invite Them to Event
2 | Show Up for Event
3 | Upgrade After Event
Step 2 | Click on the Automation you'd like to edit.
To edit emails, click on the Email you'd like to edit.
Step 3 | Send yourself a "Test Email."
・The email editor is on the right side of the workflow.
・At the bottom of the Email Editor, enter your email address where it says: "Test Mail."
・Then click "Send Test Mail."
Step 4 | Find the "Test Email" in your inbox.
Check Spam or Junk if it doesn't arrive within 1-2 minutes.
Step 5 | Copy / Paste Into Your Email Editor.
Copy the test email from your inbox & paste it into the Thrive Machine Email Editor. (Replace the copy that was previously there.)
Step 6 | Edit your email inside the Email Editor.
If you'd like to expand the space to write your email, drag the lower right corner toward the bottom of the screen.
Step 7 | Save it twice.
Click the blue "Save Action" button in the lower right corner. Then click the blue "Save" Button in the upper right corner.
EDIT YOUR AUTOMATIONS
Here's how to edit the delay between emails:
Step 1: Click the box you'd like to adjust (it starts with "Wait").
Step 2: Adjust the when: months, days, hours, minutes (as needed).
KEYS TO A SUCCESSFUL FUNNEL
Countdown Timer | Increase Sign Ups
Why is the Countdown Timer important?
The Countdown Timer counts down the number of days, hours and minutes until your event.
It adds excitement and urgency to your event, and inspires people to not want to miss out.
How does the "Countdown Timer" feature work?
Aside from counting down the days until your event, the Countdown Timer initiates your 3 email sequences that come with the Event funnel:
5 "Event Sign Up" emails | 5 "Event Show Up" emails | 5 "Upgrade" emails
If Thrive builds the funnel for you, Thrive will set up the Countdown Timer for you as well... based on the dates you provide.
After your first event, you'll need to manually adjust your Countdown Timer in 5 places:
・2 Webpages: Event Opt-In Page | Event Confirmation Page
・3 Email Automations: 1 | Invite Them to Event | 2 | Show Up for Event | 3 | Upgrade After Event
Get instructions to adjust your Countdown Timer here:
Event Funnel Set-Up | Pre-Event Instructions | Part 1 ↗️
Tags | Segment Your Emails
Why are Tags Important?
You can use Tags to segment your people. This allows you to ensure that the right people get the right emails.
There are 2 ways to tag people:
1. You can manually tag people.
2. You can automate tagging (when your people take specific actions).
1. How does manual tagging work?
Let's say that you go to an event and 10 people say that they're interested in your email list, your free gift, your consult, or your event.
You can tag them with any of the 4 tags listed below, and they'll automatically get the emails associated with those tags (see below for details).
Here's how to manually tag people:
Step 1 | Check the box of the person/people you want to add in the Contacts tab on the left.
Step 2 | Click the add tag button in the top navigation bar.
Step 3 | Choose the tag you want added from the dropdown menu.
2. How does automated tagging work?
Click on the Automations tab, and you can set up tag automations.
But, to make this easier for you, Thrive has set up 4 Tags that are automated inside your Thrive-Built Funnels.
Tag 1 | “Opt-In List” Tag
Your "Opt-In List" Tag will be your main email list that can provide you clients for years (and that you can use to promote JV Partners).
Your people will be added to the “Opt-In List” Tag in 2 ways:
1. Automatically, when they opt in to your Event Funnel.
2. Manually, when you tag them with “Opt-In List.”
Tag 2 | "Event Invite" Tag
When someone is manually or automatically tagged with the "Event Invite" tag, they'll get the 5 "Event Sign Up" Email Series.
Tag 3 | "Event 1" Tag
When someone is manually or automatically tagged with the "Event 1" tag, they'll get the 5 "Event Show Up" Email Series.
Important: You Will Need to Create a New Tag for Each Additional Event
We created the "Event 1" tag for your first event. After your first event, you will need to create a new tag for each event you lead.
This means that you can email everyone who opted in for 1 of your events or ALL of your events, depending on which tags you include in the email.
Tag 4 | "Event Replay" Tag
When someone is manually tagged with the "Event Replay" tag, they'll get Upgrade Email 1 | Replay. More on the Replay Email above ⬆️
Can I continue to segment my emails based on tags?
Yes. For example, you can send an email (or email series) to everyone in one tag or multiple tags.
How do I send additional emails (based on tags)?
Step 1 | Go to the Contacts Tab.
Step 2 | Do a Quick Search for the tag you're looking for (eg. Event Invite).
Step 3 | Click the Send Email Button (and follow the instructions).
Pipeline | Organize Your People
Your Warm Potential Clients Pipeline is reserved for your warmest potential clients.
Anyone who signs up for your events, automatically gets added to your Warm Potential Clients Pipeline.
Your Event Funnel automatically adds people to your Warm Potential Clients Pipeline when:
・They sign up for your event
・They apply for a consult
・They schedule a consult
You can manually add “interested people” to your pipelines:
Step 1 | Go to the Contacts Tab.
Step 2 | Click on the Name (or Names) of Your Potential Clients.
Step 3 | Select the Pipeline, Stage in the Pipeline, and create a name for the action.
You can drag them through the stages as you continue your relationship with them.
Optimize | Texts, Invite Video, & Event Copy
Once your funnel is complete, your job is to optimize the conversion. The goal of optimization is to get a higher percentage of people to sign up, show up and upgrade.
There are lots of ways to optimize your Event Funnel. You can use the Hire an Affordable VA template to support you to optimize your funnel... OR you can book a Specialty Coaching Session (Tech Guidance) ↗️
3 ways to optimize your funnel are:
1 | Include Text Messages
We have 9 pre-written text messages that you can include in your funnel sequence. But, there are a few steps to getting this set up (including getting a Thrive Machine phone number set up).
If you're interested in this, our team can walk you through how that works on a Specialty Coaching Session (Tech Guidance) ↗️
2 | Add a Video to the Event Opt In Page.
For this, you can use the Event Short Hot Copy as your basis for sharing about your event.
During a Specialty Coaching Session (Tech Guidance), we can help you replace the banner of your Event Opt-In Page with a video.
3 | Update the Copy
For this, you can book a Specialty Call (Copy Coaching) to get support with your Copy!
PREPARE TO LAUNCH 🚀
Create Your Unsubscribe Links & Privacy Policy
Privacy Policy
You'll need a privacy policy on all your Funnel Webpages to stay in compliance. You can find Privacy Policies for Webpages on Google or ChatGPT.
If Thrive has built your funnel for you, your Privacy Policy has been automatically added to your Funnel Webpages.
But, if you are building your funnel yourself and need to insert your privacy policy in your Webpages, click here ↗️.
Unsubscribe Link
You'll need an Unsubscribe Link for every automated or group email you send. This was automatically added to the 15 Event Funnel Emails.
If you send texts (besides appointment reminders) please include this at the end of your text: Reply STOP to unsubscribe
These will help you avoid SPAM complaints and keep your Email Deliverability higher.
If someone asks you to unsubscribe them from your email list:
Go to their contact record and click DND (do not disturb) which means that you’ll no longer be able to call, text or email them.
Event Cancellation
When your people are in the show up campaign, they’ll get emails encouraging them to show up for your event.
If they want to unsubscribe, they can click the unsubscribe link in any of the Event Funnel Emails and they’ll be able to:
A. Unsubscribe from your entire email list, OR
B. Unsubscribe from hearing about your event.
If instead of unsubscribing, they reply to your email letting you know that they can’t make the event, it's important to remove them from your 5 "Event Show Up" Emails ⬆️
Your "HUB Assets" in This Funnel
HUB Assets to Complete in This Funnel:
CLIENT ATTRACTION MASTERY ASSETS
02 » Credibility Statement(s)
03.1 » People
05.2 » My Hero's Journey Story (Full Story)
06.1 » My Code (2-4 Sentences)
09 » My Success Story (or Stories)
PLATINUM ASSETS
14 » Event Hot Copy
Updating Your Assets in the HUB
When you update the Assets in the HUB, your Assets will update inside all the Funnel Webpages and Emails.
In the Edit Version:
You will see the long "code name" of each custom value.
But you won't see the Asset that you entered into the HUB.
In the Preview Version (click the "eye" button in the upper right hand corner of your screen):
You will see what your people will see when they click on your Funnel Webpage.
But, you can't edit your Asset in the Preview Page.
Here's What We Recommend:
Step 1 | From your Edit Version, click the "eye" button. (The Preview Version will open in another tab.)
Step 2 | From your Preview Version, copy the section with your Assets and paste it OVER the same sections in the Edit Version.
Step 3 | Edit the sections in your Edit Version so the words flow elegantly.
Step 4 | Click Preview to view what your people will see when they're visiting your webpage.
What If I Don't Want to "Write Over" the Original "Assets Code"?
1. You can always clone your funnel page before you make changes.
2. You can restore previous versions. (See What Are the Basic Editing Tools? section above for instructions.)
Email [email protected] if:
1. You want to start over. We can add a new webpage or funnel back into your account.
2. If your assets in the HUB are not transferring to your Funnel or Emails.
Desktop vs. Mobile Versions
Your Funnel Webpage is made up of rows (or layers).
Most rows have 1 version that works for desktop and mobile. When you see a row with 2 versions, it means that we created a mobile version for that row to ensure good formatting for both versions.
How do I see the Layers (Rows) in My Funnel?
Go to the upper left corner of your screen, and click on the icon that looks like a stack of 3 pancakes (next to the + icon).
Making Changes to that Row
If you make a change to the mobile version, you'll have to make the same change to the desktop version (and vice-versa).
Testing Your Funnel
When you’re testing your funnel, always check both desktop and mobile versions to make sure both look good!
How do I See the Mobile & Desktop Versions?
When you're on the Funnel Page, click on the desktop and mobile icons in the top center of your screen.
TEST YOUR FUNNEL BEFORE GOING LIVE!
Intro to Testing Your Funnel
Before launching, it’s crucial to test your funnel. This section makes sure that everything works as expected (and there are no unhappy surprises).
It will also help you understand your funnel more deeply. Each dropdown includes step-by-step instructions to test its specific parts (pages, emails, etc.).
If something doesn’t work as intended, check out the Troubleshooting Guide for help. ↗️
1 | Test Your Opt-In Page
TEST YOUR OPT-IN PAGE (ON DESKTOP & MOBILE)
1 | Copy/Paste your Opt-In Page URL into an incognito browser.
✅ This is complete when your Opt-In Page appears after entering your URL.
2 | Review all your copy and formatting.
✅ This is complete when you are happy with the copy and formatting.
3 | Check if your Countdown Timer is set to your Event Date.
✅ This is complete if your Countdown Timer is counting down to your event.
4 | Click all 3 “Reserve Your Spot Now” buttons.
✅ This is complete when each button takes you down to your Opt-In Form.
5 | Fill in Opt-In form with name & email. Then click "Reserve My Spot".
✅ This is complete when:
a. You were taken to the Event Confirmation Page.
b. You received: "Opt-In List" & "Event 1" Tags.
c, You were added to "Warm Potential Clients" Pipeline.
🌱 If Everything Looks Great…
Congratulations! Your Event Opt-In Page is fully tested and ready to launch!
🌱 If Something Doesn’t Work
Check the Troubleshooting Guide ↗️
2 | Test Your Confirmation Page
TEST YOUR CONFIRMATION PAGE (ON DESKTOP & MOBILE)
1 | Copy/Paste your Confirmation Page URL into an incognito browser.
✅ This is complete when your Confirmation Page appears after entering your URL.
2 | Review all your copy and formatting.
✅ This is complete when you are happy with the copy and formatting.
3 | Add your Event to your calendar:
・ Click the "Add Event to Calendar" button.
・ Add the event to your preferred calendar.
✅ This is complete when:
a. You see the correct date/time added to your calendar.
b. You got a Confirmation Email within 1-2 mins.
🌱 If Everything Looks Great…
Congratulations! Your Event Confirmation Page is fully tested and ready to launch!
🌱 If Something Doesn’t Work
Check the Troubleshooting Guide ↗️
3 | Test Your Replay Page
TEST YOUR REPLAY PAGE (ON DESKTOP & MOBILE)
1 | Copy/Paste your Replay Page URL into an incognito browser.
✅ This is complete when your Replay Page appears after entering your URL.
2 | Review all your copy and formatting.
✅ This is complete when you are happy with the copy and formatting.
3 | Click on your Event Recording and watch your event play.
✅ This is complete after your Event Recording plays perfectly.
4 | Scroll below your video and click on the "Book a Call" button.
✅ This is complete when the button takes you down to your Consult Calendar.
5 | On your Consult Calendar, choose a date/time and fill out the fields.
✅ This is complete if your Consult Calendar has availability
6 | Click the "Schedule Meeting" button.
✅ This is complete after you schedule a consult & it shows up in your personal calendar.
🌱 If Everything Looks Great…
Congratulations! Your Event Replay Page is fully tested and ready to launch!
🌱 If Something Doesn’t Work
Check the Troubleshooting Guide ↗️
4 | Test Your Emails
TEST ALL 15 EVENT FUNNEL EMAILS (USING THIS PROCESS)
・Go to Automations / Event Funnel Workflows 8.0.
・Open "Sign Up" Emails.
・Start with: "Invite them to Event" and choose Event Sign Up Email 1.
・The email will open in the Email Editor (on the right side of workflow).
・Go to the bottom of Email Editor to "Test Mail."
・Enter your email. Click "Send Test Mail."
・Use the Right Column to ensure all 15 emails are ready.
✅ Your Event emails are ready if you're happy with:
a. Who it's from.
b. Who it's to.
c. The Subject.
d. The Copy inside the email.
e. The Links work.
f. Dates & Times are correct.
g. Your Unsubscribe link is present.
🌱 If Everything Looks Great…
Congratulations! Your Event Emails are fully tested and ready to launch!
🌱 If Something Doesn’t Work
Check the Troubleshooting Guide ↗️
SET UP YOUR NEXT EVENT
Pre-Event Instructions | Update the Date & Tag
If you are completing this Event Funnel yourself
You will need to set up your own date and time of your first event. You can use the "Event 1" Tag that's available in the Tags section of your account.
If your Event Funnel was built by Thrive (DFY)
We will set up your first event with the date and time you provided to us. But, as soon as your event is over, it's important to get ready for your next event.
Pre-Event Instructions
1 | Update Your Event Dates and Countdown Timer
2 | Update Your “Add Event to Calendar” Pop-Up
3 | Create a New Tag for Your Event
4 | Update Your Email Automations with Your New Tag
Go to Event Funnel Set-Up | Pre-Event Instructions | Parts 1-4 ↗️ for a step-by-step guide.
Don’t Have a Date for Your Next Event?
It’s ideal to have a regular rhythm for your events (like leading weekly or monthly events). But if you don’t have a date for your next event you can send them to your Replay Page. For instructions, see Post-Event Instructions | The Replay below.
Want to have multiple dates or event titles available simultaneously?
Check out Can I Lead Multiple Events or Paid Events? below ⬇️
Post-Event Instructions | The Replay
Want Immediate Sign Ups for Your Next Event?
Ideally, within 1 hour of your event, you (or a team member) will change the dates on your Event Funnel to your Next Event’s dates.
(So that you never have old dates on your webpage.)
For instructions on how to adjust your dates, go to Pre-Event Instructions | Update the Date & Tag above ⬆️
Post-Event Instructions
1 | Upload your Event Recording to the Event Replay Page
2 | Link your Consult Calendar in the Event Replay Page
3 | Link your Event Replay Page in your Event Replay Email
Go to Event Funnel Set-Up | Post-Event Instructions | Parts 1-4 ↗️ for a step-by-step guide.
Don’t Have a Date for Your Next Event?
It’s ideal to always have a regular rhythm for your events (like leading weekly or monthly events).
But if you don’t have a date for your next event you can:
Step 1 | Upload your Event Recording.
Step 2 | Redirect them from your Event Opt-In Page to your Replay Page.
Don't have a date for Your Next Event OR Replay?
You can book a Specialty Coaching Session (Tech Guidance) to have your people opt in for a "Join My Waitlist" page.
How do I redirect the Event Opt-In Page to the Event Replay Page?
We recommend leaving your Replay page up for 3 days (if you have a new date up).
After 3 days, remove the redirect so they can visit your Event Opt-In Page (with new dates).
Can I Lead Multiple Events or Paid Events?
Your Six Figure Speaker Recommendations
In Six Figure Speaker, we recommend leading the same event weekly or monthly and turning your event into a life-changing cash machine.
We recommend that you:
1 | Have 1 Event Date live on your funnel, so you are filling one event at a time.
2 | Change the date on your funnel to your next event date (as soon as your event is over).
3 | Deliver free events (to lower the barrier to entry) and then invite more people to your next step.
Want to have multiple events available simultaneously?
You'll need to clone this Event Funnel and create a new one for each event if you want to:
1 | Have multiple events available with the same title, OR
2 | Multiple events available with different titles.
It takes some technical skill to clone funnels and great proofing to make sure that there are no mistakes.
You can use 1 (or more) Specialty Coaching Call with our Tech Guide. Or you can hire a VA to do this for you.
Either way, it's important that you take full responsibility for making sure all the info in all of your funnels is correct.
To create a new Event Funnel, you'll need to clone these:
・3 Funnel Webpages
・15 Funnel Emails
・1 Event Opt-In Form
・3 Workflow Automations
・And you'll also need to add a new tag
How to charge for your event
Book a Specialty Coaching Session (Tech Guidance) and we can help you take payment for your events.

© 2023 THRIVE ACADEMY. ALL RIGHTS RESERVED
© 2023 THRIVE ACADEMY. ALL RIGHTS RESERVED